
Friendly Captcha for Salesforce
Integrating Friendly Captcha involves a front-end component and a back-end component. We recommend familiarizing yourself with the Friendly Captcha documentation to develop a baseline understanding of how an integration works.
For the front-end component of the integration, this package provides a Lightning Web Component (LWC). If you're using Visualforce, you should be able to insert the standard markup for the front-end integration, instead of using the LWC.
For the back-end component of the integration, this package provides an Apex class that performs an HTTP request to the Friendly Captcha site verification API.
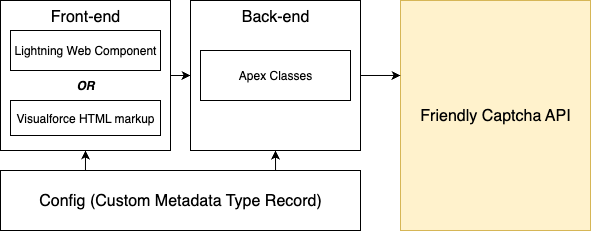
The LWC or HTML scripts render a Friendly Captcha widget on your website. After the challenge is solved, the solution is passed to your back-end, where the Apex class is used to verify the solution in a request to the Friendly Captcha API. Both the LWC and the Apex class can read configuration settings from a Custom Metadata Type Record.
Installation
To install Friendly Captcha for Salesforce, you will need administrator privileges for your Salesforce organization. You will also need to use the command line.
If possible, we recommend testing the installation in a development Salesforce organization.
The best way to install Friendly Captcha for Salesforce is by deploying the source code to your Salesforce organization. First, download the project from GitHub onto your local computer. In your terminal, cd into the friendly-captcha-salesforce directory.
If you don't already have the Salesforce CLI installed, you can either install it from the website, or you can run it in a Docker container:
docker run --rm -it -v $PWD:/app -w /app salesforce/cli:latest-full
Next, authenticate the Salesforce CLI with your Salesforce organization:
Authenticating if you installed the CLI from the website
If you installed the Salesforce CLI directly (i.e., without Docker), you can authenticate using a web browser by running
sf org login web --alias=MySFOrg
This will open a web browser where you log in with your Salesforce admin credentials. After you successfully log in, your command line session should be authenticated.
Authenticating if you are using Docker
If you're using Docker, you may not be able to use the web browser authentication flow. Instead, you can use the device authentication flow:
sf org login device --alias=MySFOrg
Follow the instructions in the output of the command to authenticate your session.
If everything is successful, you should see your organization in the output when you run
sf org list
To deploy Friendly Captcha for Salesforce to your organization, run
sf project deploy start --target-org MySFOrg
You should see a list of resources deploying into your organization. When the command finishes, you can proceed to configuration.
Configuration
To use Friendly Captcha for Salesforce, there are a few configuration parameters that you have to supply. At minimum, you have to supply a sitekey for the front-end integration and an API key for the back-end integration.
There are a few different ways to configure your integration with the required values.
Custom Metadata Type Record
A simple way to set the configuration parameters is to add them to the Custom Metadata Type Record. Both the LWC and the Apex class will by default read the parameters from this record.
Navigate to Setup, search for "Custom Metadata Types", and click through to visit the page. From the list of CMDTs, find the one with the API Name friendlycaptcha__Config__mdt.
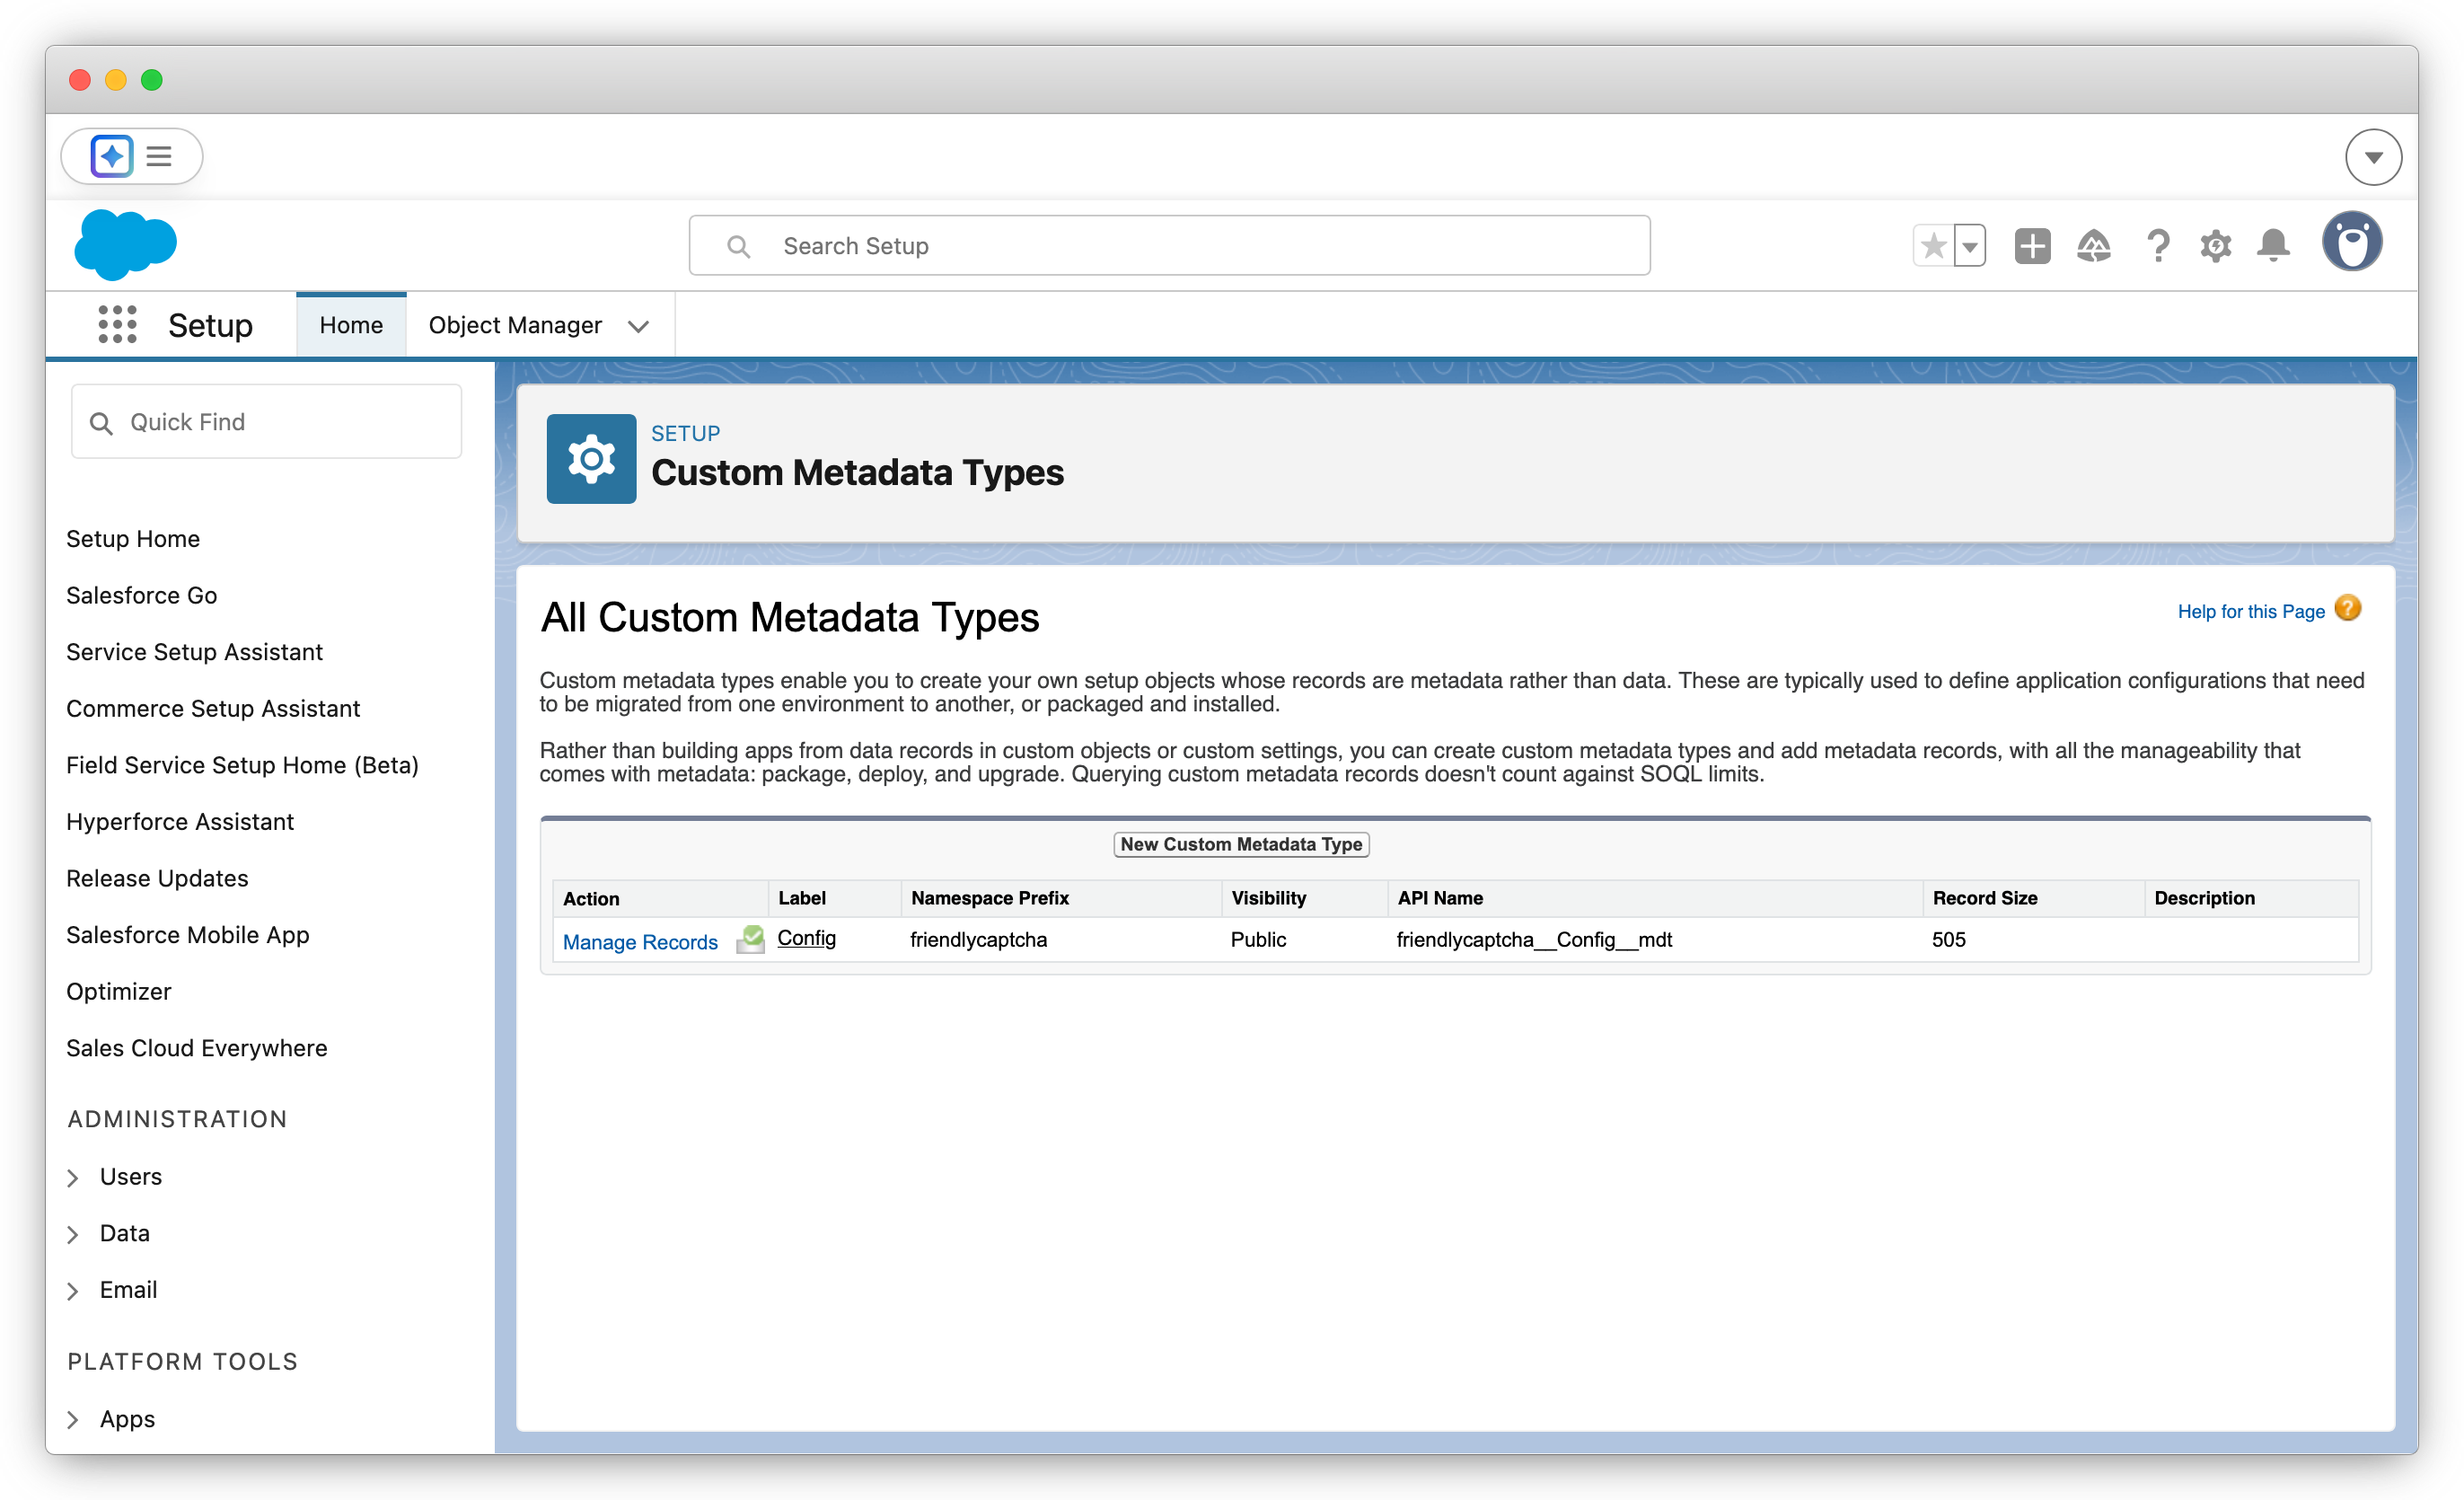
Click the Manage Records link, and then edit the Settings record. You'll see a form where you can set values for the various configuration parameters available.
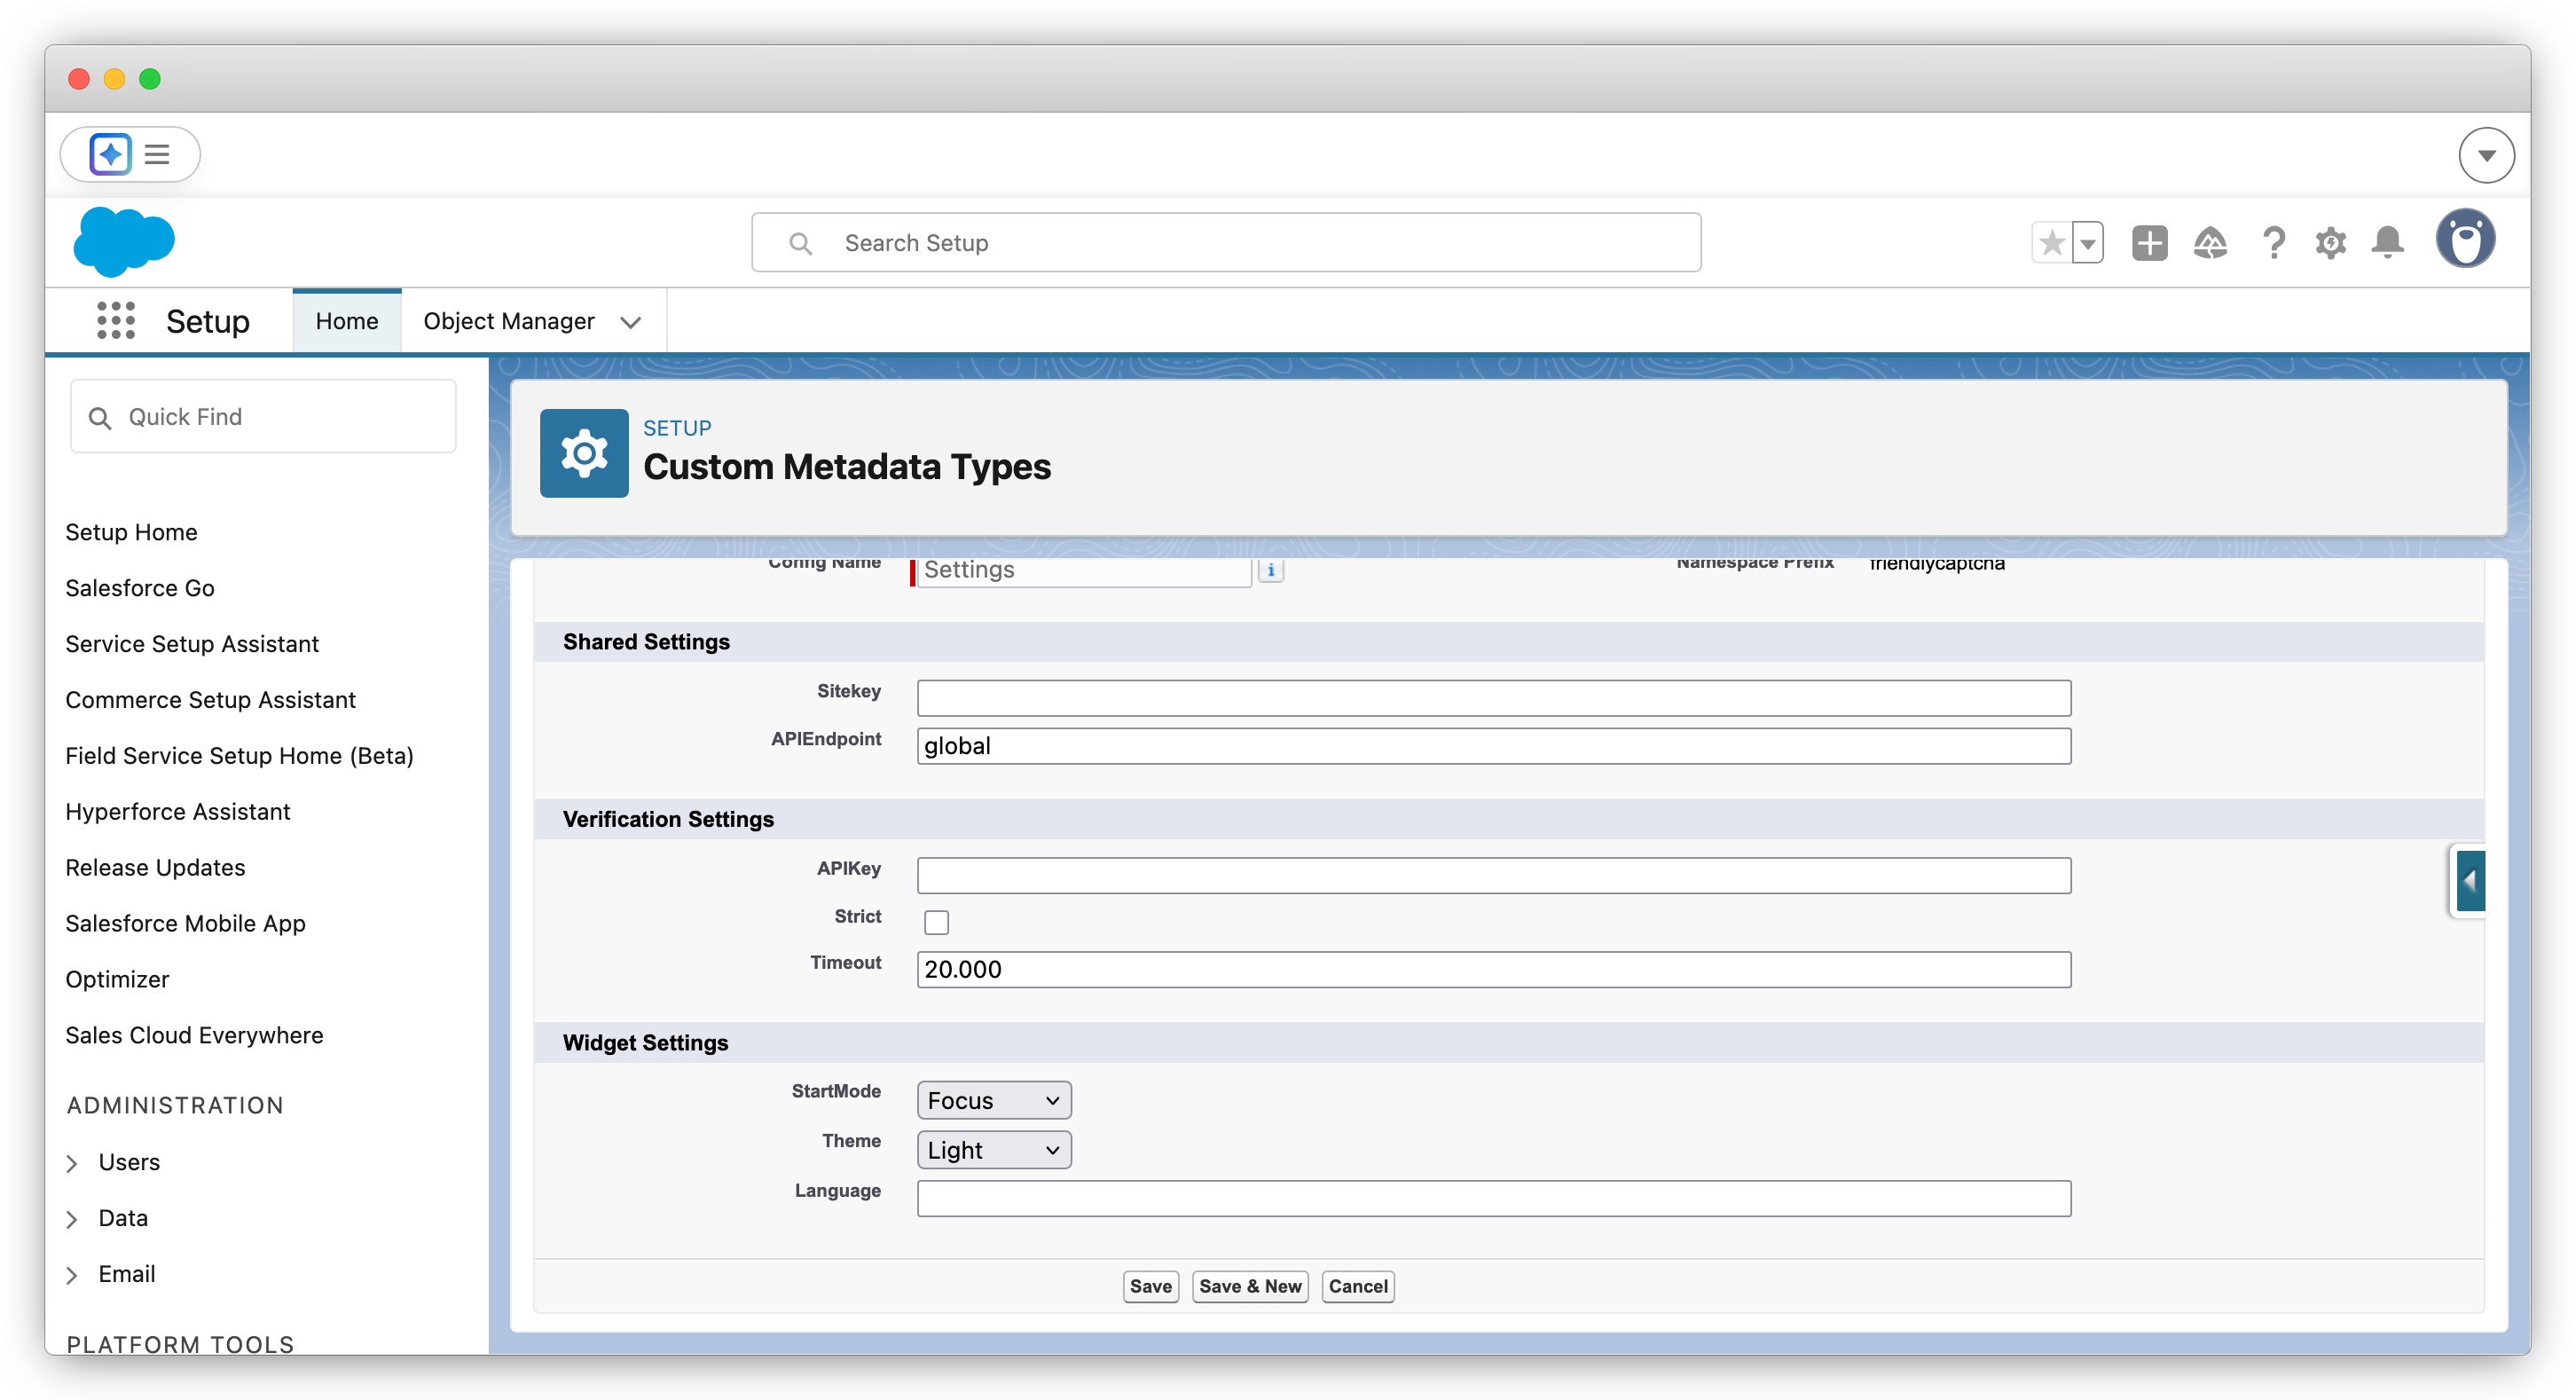
Verification Settings are used by the back-end (Apex class). Widget Settings are used by the LWC. Shared Settings are used by both. Make sure you enter at least a sitekey and an API key. The following table provides a summary of the configuration options.
| Setting | Location | Description |
|---|---|---|
| Sitekey | Shared | A Friendly Captcha sitekey associated with an application. You can find this value in the application configuration in the Friendly Captcha dashboard. |
| APIEndpoint | Shared | The endpoint URL used for communicating with the Friendly Captcha API. Shorthands 'eu' or 'global' are accepted. Default is 'global'. Using the 'eu' endpoint requires access that must be enabled in the Friendly Captcha dashboard. |
| APIKey | Apex | An API key used for communicating with the Friendly Captcha API. You can create an API key in the Friendly Captcha dashboard. |
| Strict | Apex | Determines the failure mode behavior of the captcha response verification (siteverify) result. This mode only applies when the API was not able to verify the response, which might occur for network connectivity reasons or a misconfiguration of the client. When 'strict' is enabled, unverified responses will be set to 'reject' (i.e. fail-closed behavior). When disabled (the default), unverified responses will be set to 'accept' (i.e. fail-open behavior). |
| Timeout | Apex | How long (in milliseconds) to wait for a captcha response verification request to complete. |
| StartMode | LWC | The start mode determines the behavior around automatic activation of the widget. Activation here means the challenge gets requested and gets solved. |
| Theme | LWC | The theme for the widget. |
| Language | LWC | Language code such as "en" for English or "de" for German. Defaults to automatic language detection. Usually you should not set this yourself and instead let the widget detect the language automatically. |
Apex Class
You can directly set back-end configuration parameters using the friendlycaptcha.Options Apex class. Here's what that looks like:
friendlycaptcha.Options opts = new friendlycaptcha.Options()
    .apiKey('<API KEY>')
    .sitekey('<SITEKEY>')
    .apiEndpoint('<API ENDPOINT>')
    .strict(<true/false>)
    .timeout(<int>);
You then pass the friendlycaptcha.Options instance to the verifyCaptchaResponse method.
friendlycaptcha.VerifyResult result = friendlycaptcha.Client.verifyCaptchaResponse('<CAPTCHA RESPONSE>', opts);
Lightning Web Component
You can pass front-end configuration parameters to the <friendlycaptcha-widget> LWC like this:
<friendlycaptcha-widget
  sitekey="SITEKEY"
  apiEndpoint="API ENDPOINT"
  startMode="STARTMODE"
  language="LANGUAGE"
  theme="THEME"
></friendlycaptcha-widget>
Flow Example
This example shows how to use Friendly Captcha for Salesforce in a Flow. We'll create a simple login screen that displays a Friendly Captcha Widget and includes server-side captcha verification. The pattern outlined here should be translatable anywhere you can use LWCs and Apex classes.
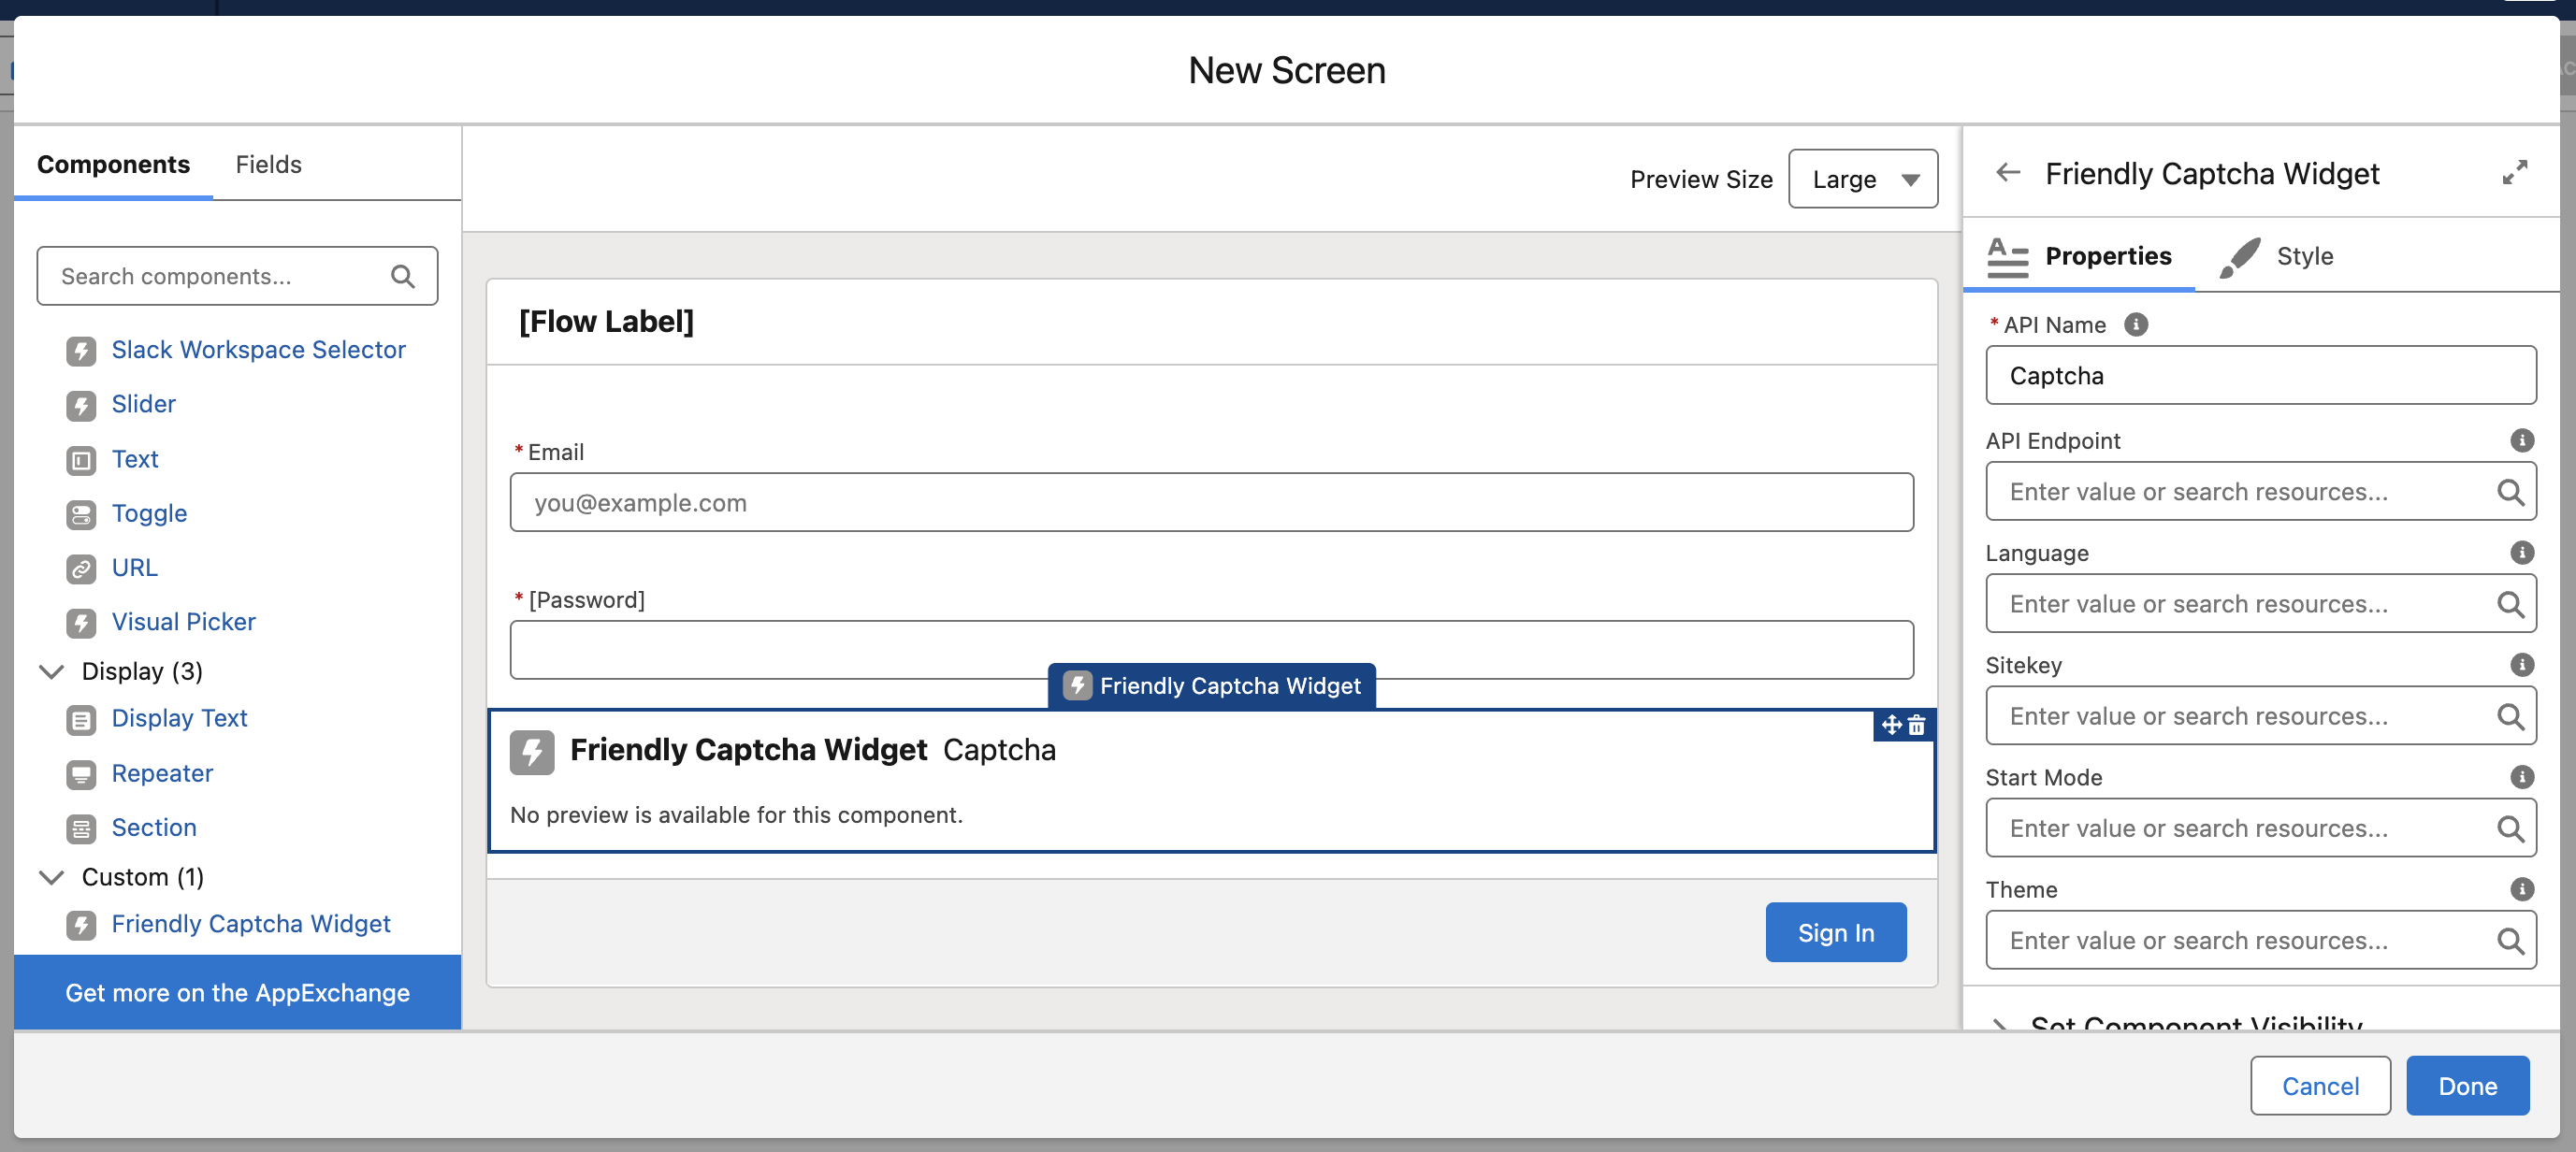
Create a new Screen Flow in Setup
This will open the Flow Builder app with Start and End elements. Add a Screen Flow with an Email component and a Password component, and then scroll down to the list of custom components to add a Friendly Captcha Widget component. If you haven't configured your integration by following the steps listed above, make sure to at least add a value for the Sitekey field at this step (under Properties).
Create an Apex Action to verify the captcha response
Navigate to Apex Classes in Setup. Create a new Apex Class with the following content.
public class LoginAction {

    @InvocableMethod(label='Verify Captcha')
    public static List<Response> verify(List<Request> requests) {
        List<Response> responses = new List<Response>();

        for (Request request : requests) {
            Response response = new Response();
            friendlycaptcha.VerifyResult result = friendlycaptcha.Client.verifyCaptchaResponse(request.captchaResponse);
            response.success = result.shouldAccept();
            if (result.getErrorDetail() != null) {
                response.error += result.getErrorDetail();
            }
            responses.add(response);
        }

        return responses;
    }

    public class Request {
        @InvocableVariable(label='Captcha Response' required=true)
        public String captchaResponse;

        @InvocableVariable(label='Sitekey' required=false)
        public String sitekey;
    }

    public class Response {
        @InvocableVariable(label='Error')
        public String error = '';

        @InvocableVariable(label='Success')
        public Boolean success;
    }
}
This Apex Action calls the Friendly Captcha API to verify the captcha response generated in the previous Flow element. If Friendly Captcha is able to verify the captcha response, the success flag is set to true. Any errors returned by the API are also included in the output of this Flow element.
The friendlycaptcha.Client.verifyCaptchaResponse() method requires an API key for authentication. Make sure you've configured an API key as outlined in the documentation on configuration.
You could perform other kinds of validation (for example on the email and password) in this action as well. Save the Apex class and return to your Screen Flow.
Add the "Verify Captcha" Apex Action to your Screen Flow
It should come after the Login Screen element. Make sure to connect the "Captcha Response" (and optionally "Sitekey") variables from the Screen element as inputs to the Apex Action element.

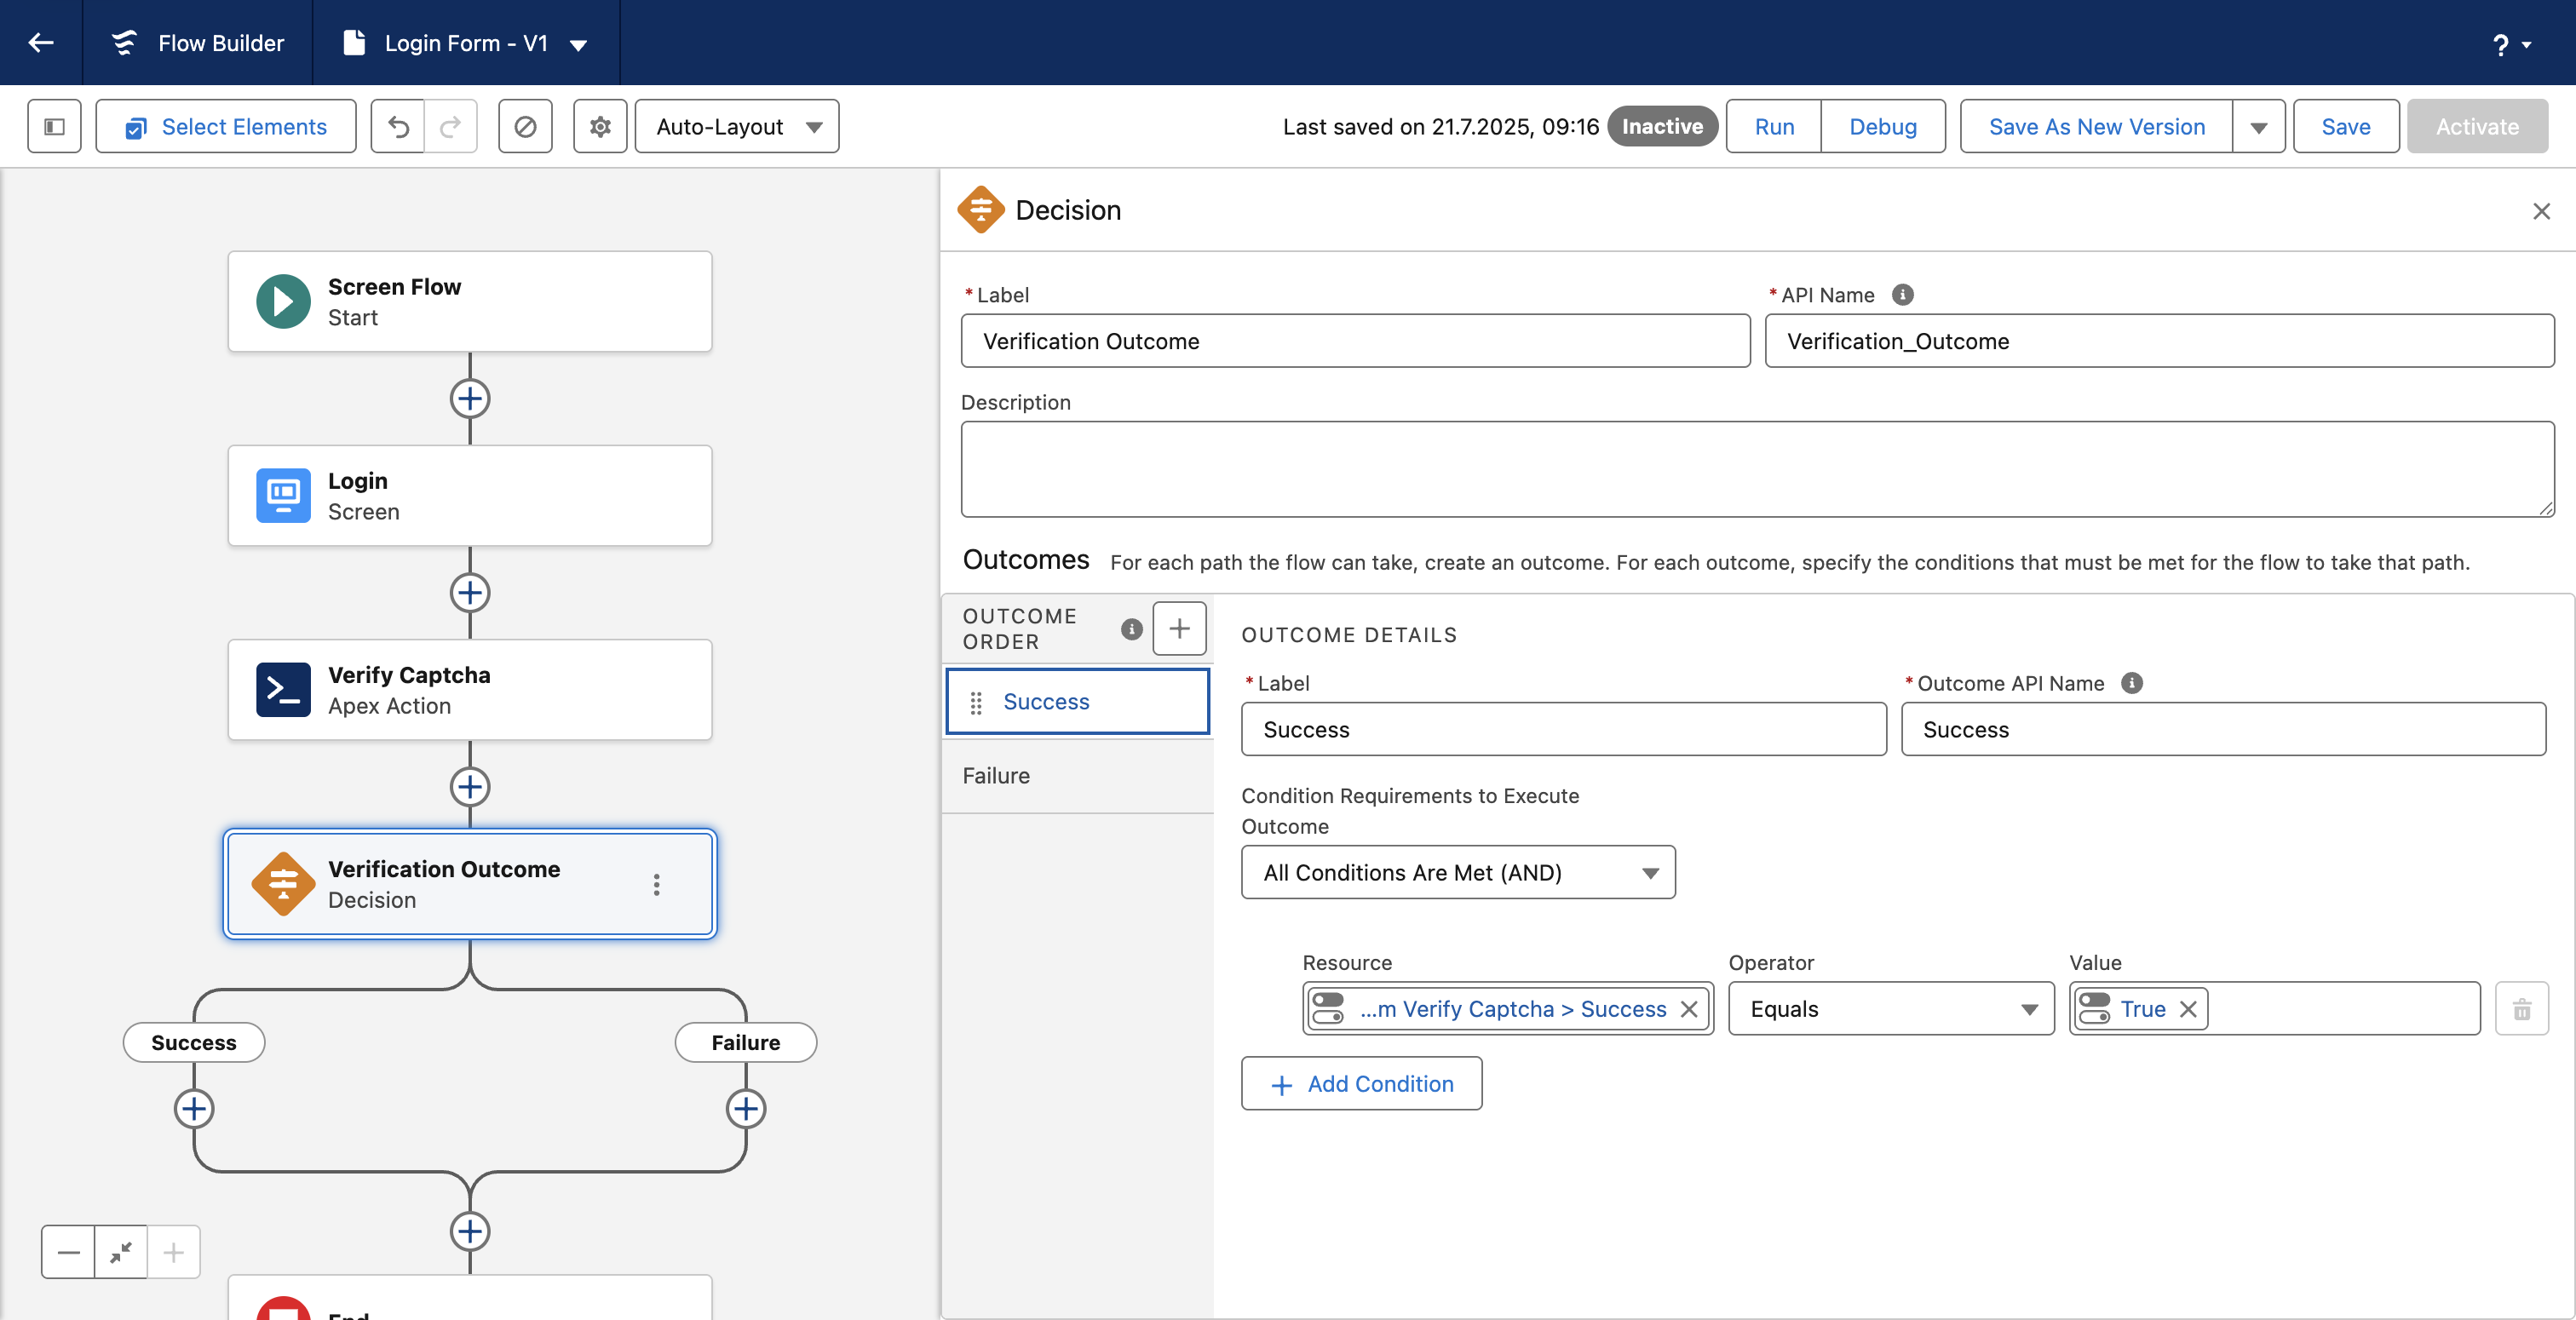
Add a Decision element based on the output of the Apex Action
You can use the success and error output variables of the Apex Action to render success or failure screens. Add a Decision element that leads to "Success" or "Failure" based on whether the success variable is true or false. In this example, depending on whether the verification is successful, a different screen is presented.
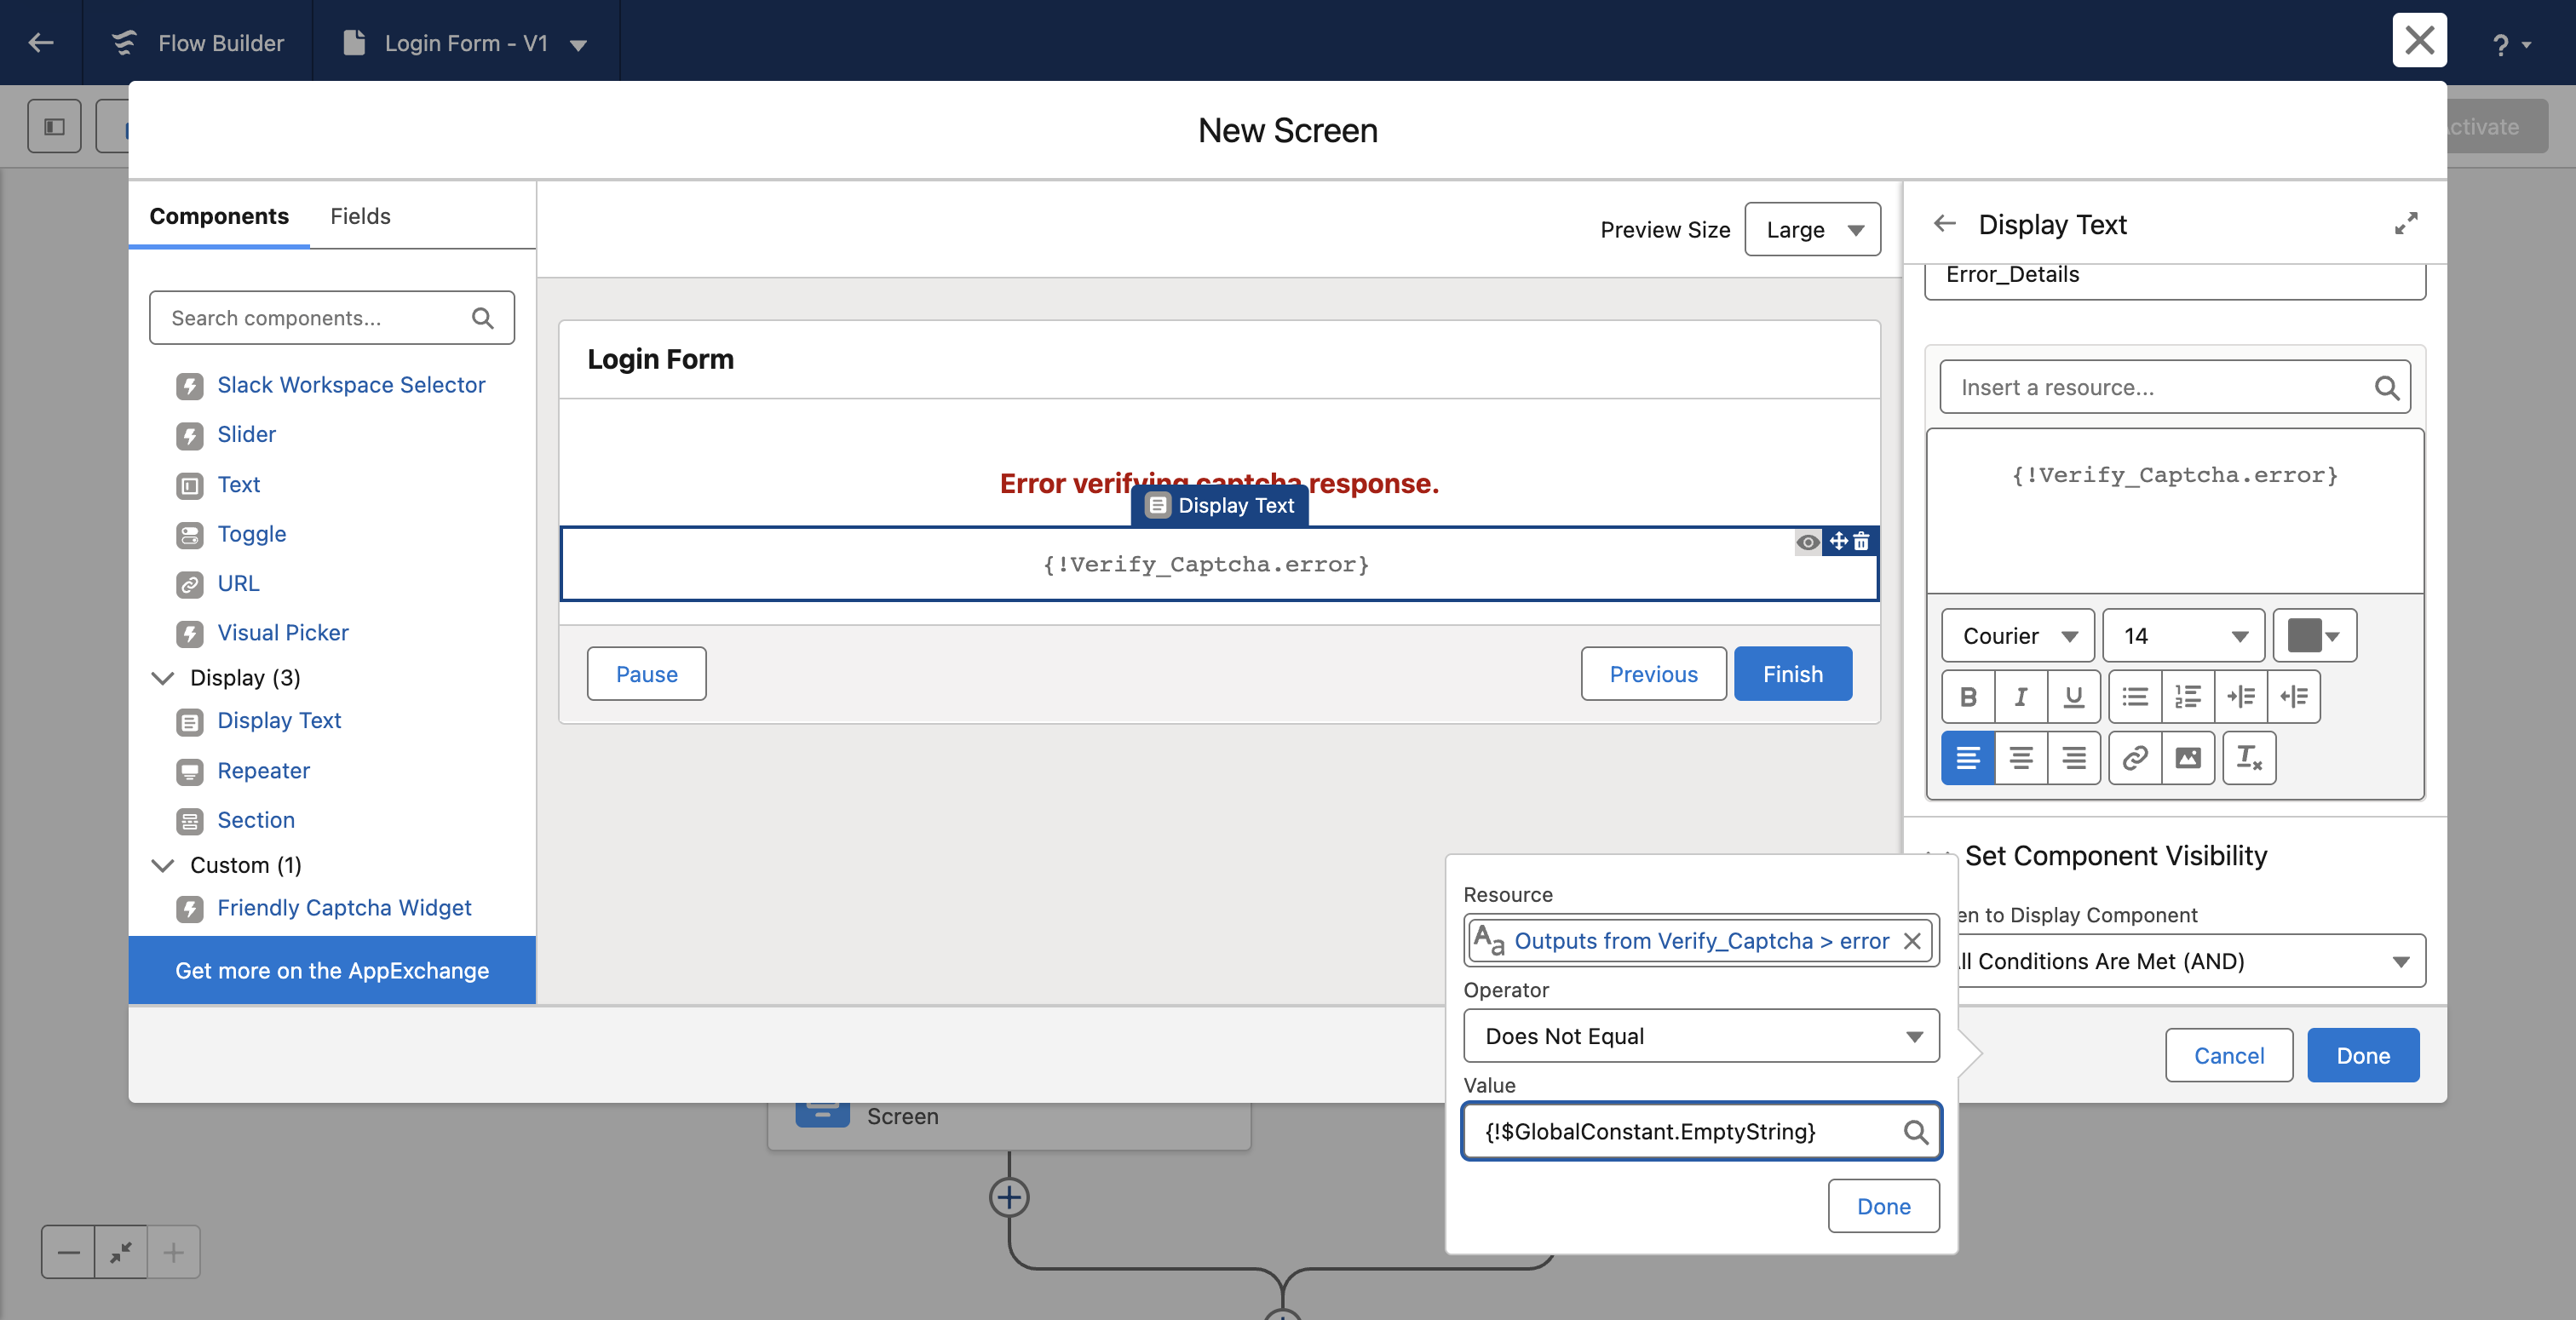
In this implementation, we chose to render Screen elements that showed a simple confirmation text on success, and a failure message otherwise. In the failure message, you can conditionally render the error message if it's present:
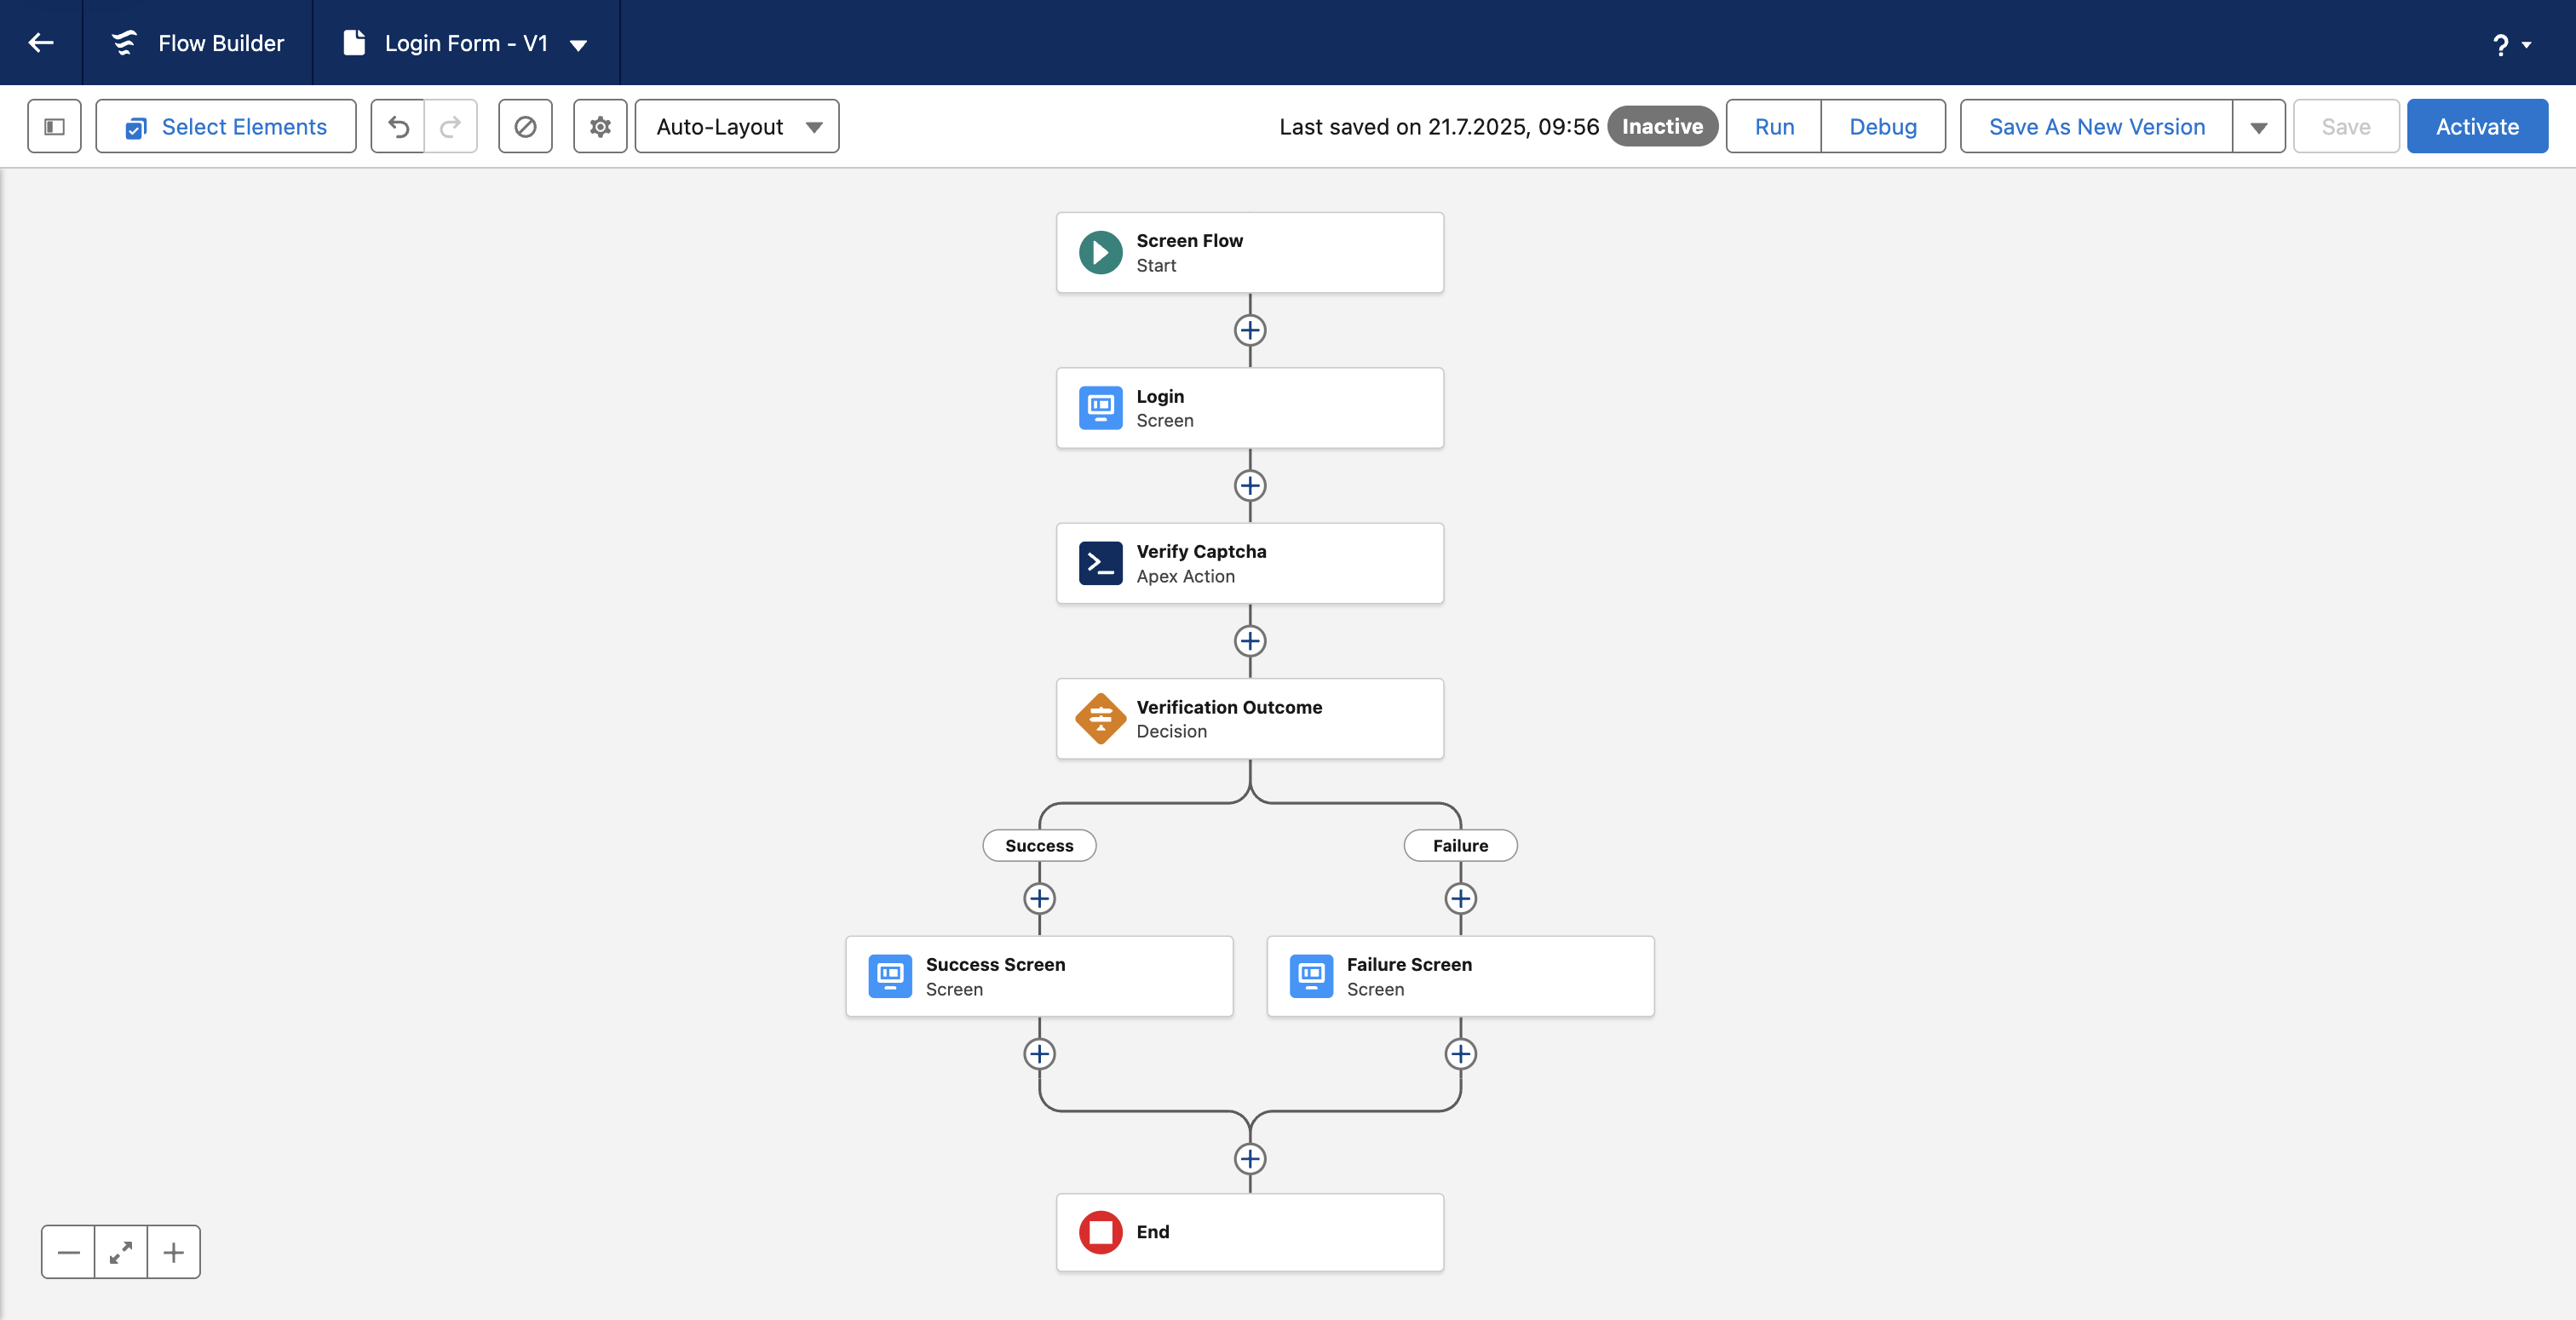
Here's the final Flow:
API Reference
Apex Class
Click here for the Apex reference documentation.
Lightning Web Component
Using the LWC from code (e.g. from within another LWC) looks like this:
<friendlycaptcha-widget
  sitekey={sitekey}
  api-endpoint={endpoint}
  theme={theme}
  start-mode={startMode}
  language={language}
></friendlycaptcha-widget>
Note that all properties (except sitekey) are optional and have sensible defaults. The LWC will attempt to read these properties from the "Settings" record of the Config__mdt CMDT; properties passed directly to the LWC take precedence.
The LWC also exposes all events exposed by the widget itself:
<friendlycaptcha-widget
  sitekey={sitekey}
  oncomplete={handleComplete}
  onerror={handleError}
  onexpire={handleExpire}
  onstatechange={handleStateChange}
></friendlycaptcha-widget>
Each event handler receives an event argument with a detail property matching the shapes documented on the Widget SDK Events page.